Adding PlayStation 4 console to Suitest
- PlayStation 4
Suitest supports a PlayStation 4 TestKit or DevKit. After setting up your PlayStation 4 console you will be able to run automated tests on HTML-based applications (WebMAF).
PlayStation 4 devices can be controlled only by a SuitestDrive running on MS Windows operating system.
In order to use SuitestDrive, you need to pair it with your Suitest account first.
SDK 7.00 and System Software 7.020.011 or higher
Important: If you are using an older SDK or a console with OS version lower than 7.020.011, please refer to these specific instructions.
Prerequisites
- PlayStation 4 TestKit or DevKit
- PlayStation developer / partner account credentials.
- Windows computer with SuitestDrive downloaded and paired.
Prepare the Windows computer
On the Windows computer that is running SuitestDrive, please do the following:
- Download the PlayStation SDK Manager.
- Install the Target Manager Server. It should be installed in the default location on
C:drive, if this is not possible please see the troubleshooting section.
Prepare your PlayStation 4
You will need to prepare your PlayStation 4 for testing:
- Make sure the console has a wired Ethernet connection (should be the on same network as the Windows computer running SuitestDrive).
- Switch the console into Assist Mode - Debug Settings / Boot Parameters / Release Check Mode.
- Enable automatic log in - Settings / Login Settings / Log In to PS4 Automatically.
Add the PlayStation 4 to Suitest
Open the Add device wizard then select Add physical device, then choose PlayStation 4 from the platform list and press Next.
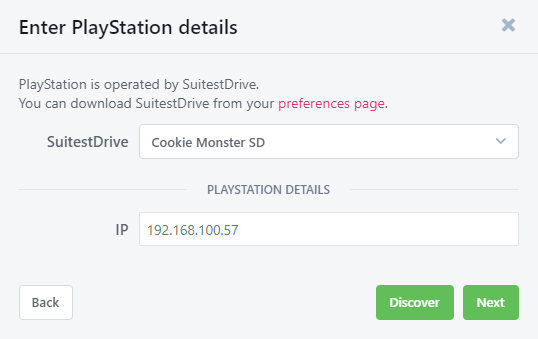
On the Enter PlayStation 4 details screen, do the following:
- Select the SuitestDrive that will be controlling the console.
- Discover all available devices or input the local device IP manually.
- Press Next to finish device adding process.

Now that you have your PlayStation configured, it's time to instrument your app and start testing.
SDK 6.50 or System Software 7.01 or lower
Prerequisites for older SDK or System Software
- PlayStation 4 TestKit or DevKit
- PlayStation developer / partner account credentials.
- Windows computer with SuitestDrive downloaded and paired.
- USB - CEC Adapter to control your device.
Important: When using USB-CEC Adapter, you have limited set of keys available.
Prepare the Windows computer for older SDK or System Software
On the Windows computer that is running SuitestDrive, please do the following:
- Download the PlayStation SDK Manager.
- Install the Target Manager Server. It should be installed in the default location on
C:drive, if this is not possible please see the troubleshooting section. - Download and install .NET Framework 4.7 (or newer).
- Download and install Microsoft Visual C++ Redistributable.
Note: You may already have the Microsoft Visual C++ Redistributable installed or .NET Framework 4.7 (or newer) which is part of the Windows Creators Update.
Prepare your PlayStation 4 for controlling via USB-CEC adapter
You will need to prepare your PlayStation 4 for testing:
- Make sure the console has a wired Ethernet connection (should be the on same network as the Windows computer running SuitestDrive).
- Switch the console into Assist Mode - Debug Settings / Boot Parameters / Release Check Mode.
- Enable automatic log in - Settings / Login Settings / Log In to PS4 Automatically.
- Enable HDMI Device Link - Settings / System / Enable HDMI Device Link.
Connecting the devices
A connection between the Windows computer, PlayStation 4 and USB - CEC Adapter must be made.
Make sure you have the following layout:
- USB - CEC Adapter is connected to the Windows computer via USB.
- HDMI from the console is connected to the PC port on the USB - CEC Adapter.
- HDMI from the TV port on the USB - CEC Adapter is connected to a monitor or TV.
Add the PlayStation 4 controlled via USB-CEC adapter to Suitest
Open the Add device wizard then select Add physical device, then choose PlayStation 4 from the platform list and press Next.
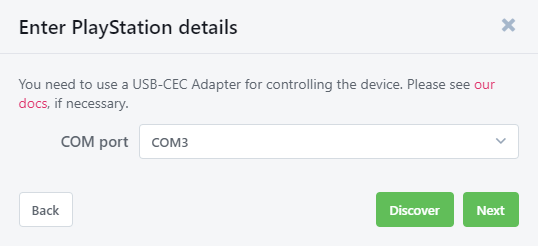
On the Enter PlayStation 4 details screen, do the following:
-
Select the SuitestDrive that will be controlling the console.
-
Discover all available devices or input the local device IP manually.
-
Press the Next button.

PlayStation 4 details -
Discover all available COM ports and select the COM port that will be controlling the console.

PlayStation 4 details - COM port -
Press Next to finish device adding process.
Now that you have your PlayStation configured, it's time to instrument your app and start testing.
Something went wrong?
Please check the PlayStation 4 troubleshooting section for guidance.
