Instrumenting iOS/iPadOS applications
- Apple iPhone / iPad (iOS)
- Apple iOS/tvOS Simulator
Use CocoaPods to instrument an iOS application in a few easy steps. At this point you should have a working Apple iPhone/iPad in your Suitest account.
Suitest supports native apps written in Objective-C or Swift.
In case of testing on real devices, Suitest supports only
.ipapackage file extension. See Uploading package to Suitest section below.In case of testing on simulator, Suitest supports only
.zippackage file extension. See Uploading iOS/iPadOS simulator builds section below.
Instrumenting iOS/iPadOS apps written in Swift
-
Include the Suitest instrumentation library for iOS/iPadOS by adding a dependency to your
Podfile:target 'Target' do pod 'Suitest' endCheck the official Podfile guide for more information about using the Podfile.
-
Add
SuitestLauncher.instance.start()to yourAppDelegatefile. The final result should look like the following:import Suitest_iOS func applicationDidBecomeActive(_ application: UIApplication) { SuitestLauncher.instance.start() }
Instrumenting iOS/iPadOS apps written in Objective-C
-
Include the Suitest instrumentation library for iOS/iPadOS by adding a dependency to your
Podfile:target 'DevelopmentTarget' do pod 'Suitest' end # Suitest instrumentation library is written in *Swift*, so the Objective-C # compiler may complain about not knowing the Swift version. # The below makes the compiler happy. post_install do |installer| installer.pods_project.targets.each do |target| target.build_configurations.each do |config| config.build_settings['SWIFT_VERSION'] = '5.0' end end end ENV['SWIFT_VERSION'] = '5'Check the official Podfile guide for more information about using the Podfile.
-
Add
[[SuitestLauncher instance] start]to yourAppDelegatefile. The final result should look approximately like so:#import <Suitest_iOS/Suitest_iOS-swift.h> - (void)applicationDidBecomeActive:(UIApplication *)application { [[SuitestLauncher instance] start]; }
Instrumenting iOS/iPadOS WebView apps
Suitest supports WKWebView implementation of WebView applications.
-
Include the Suitest instrumentation library for iOS/iPadOS depending on the language you are using
- if Swift
- do the 1. step of Instrumenting iOS/iPadOS apps written in Swift
- if Objective-C
- do the 1. step of Instrumenting iOS/iPadOS apps written in Objective-C
- if Swift
-
Add
WKNavigationdelegation method in yourViewConntrollerwhere the WebView is located file. The final result should look like the following:import Suitest_iOS func webView(_ webView: WKWebView, didFinish navigation: WKNavigation!) { SuitestWebViewInstrumentation.instance.instrument(webView) }
Using Swift Package Manager
- Open Xcode
- Go to your project
- Click on the project icon
- Go to Swift Packages tab
- Add new package with + button

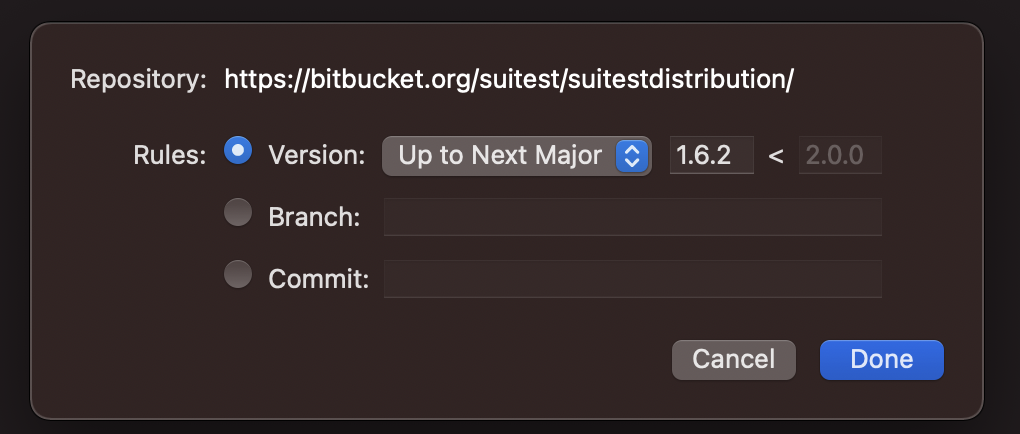
Opening the project in Xcode - Modal window will open
a) Enter the URL of the repository
b) Use version rules and select/insert the rest of the information based on your needs
Modal window for the package details on older Xcode versions 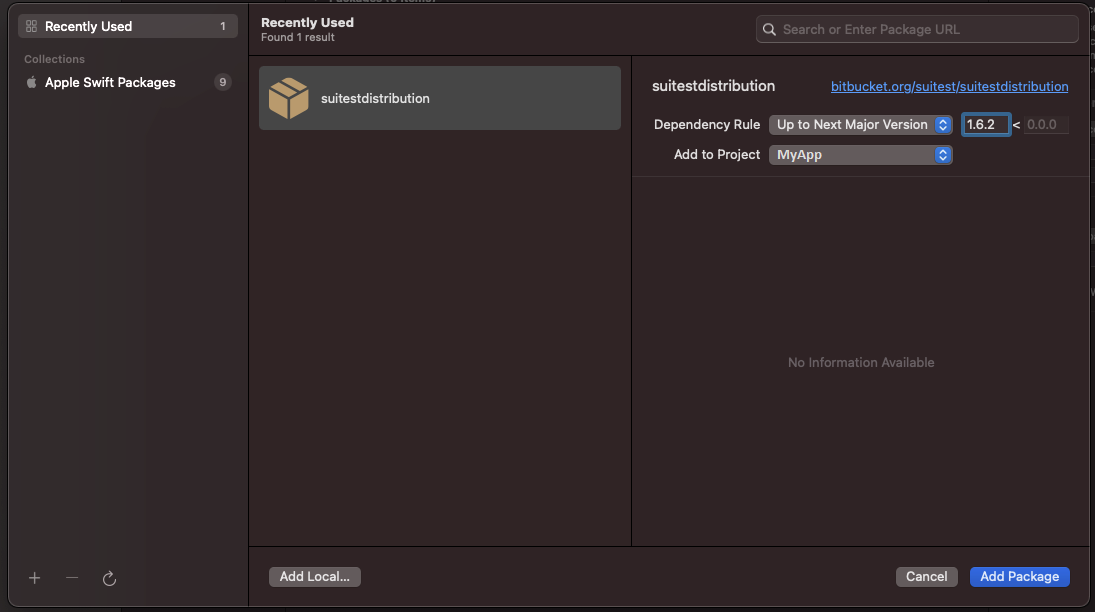
Modal window for the package details from Xcode 13
Uploading package to Suitest
After you have instrumented the code create a development build of your app and upload it at the Suitest configuration (Settings tab) page. Suitest will automatically install or update the package on the device as necessary when you try running the app.
If you use Suitest Network API you can also send the package with an API request. Suitest will automatically install or update the package on the device as necessary when you try running the app on this device.
App package signing
According to Apple code signing guidelines the app package must be signed with a certificate allowing it to run on a particular device. You should make sure that this has been followed before you attempt to run the app through Suitest on your device. Suitest does not attempt to sign the app.
Important: Make sure you are correctly logged into Xcode with your developer account, to avoid code signing issues. Check how to login into Xcode.
App Store/TestFlight builds
Due to Apple restrictions, Suitest cannot automatically install App Store and TestFlight builds on a device. In order to use these types of builds for testing with Suitest, you must install the app on a device manually and upload the same build to Suitest.
Before uploading to the App Store
Suitest is intended for testing environment, however, it can be uploaded to the Apple App Store if you decide to do so at your own risk. The instrumentation library is in an inactive state until it is opened or ran through Suitest.
If you decide to upload your application to the App Store and wish to test your live application, make sure that the package uploaded to the App Store is also the package uploaded to your Suitest configuration. If Suitest finds that the current running app on the device (from the App Store) is a different version to what is in the configuration, it will automatically install and run the application package from the configuration you have currently selected.
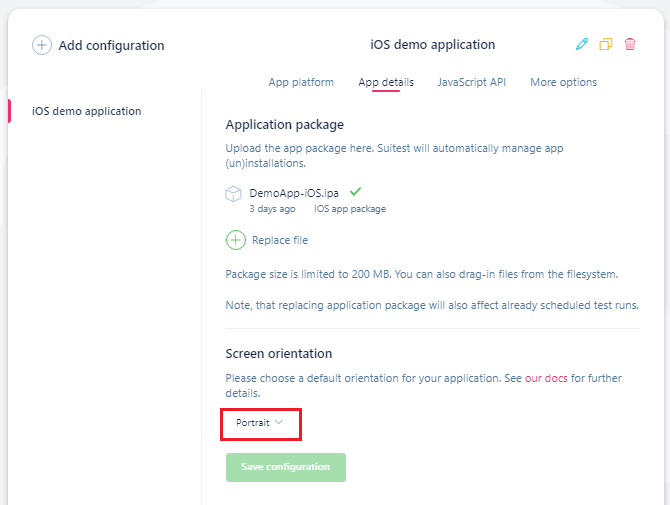
Setting up the screen orientation
Sets the orientation of the app on the device screen to one of the following values:
- Portrait
- Portrait (upside down/reversed)
- does not work on iOS devices when Face ID is used for authentication
- Landscape (left)
- Landscape (right/reversed)
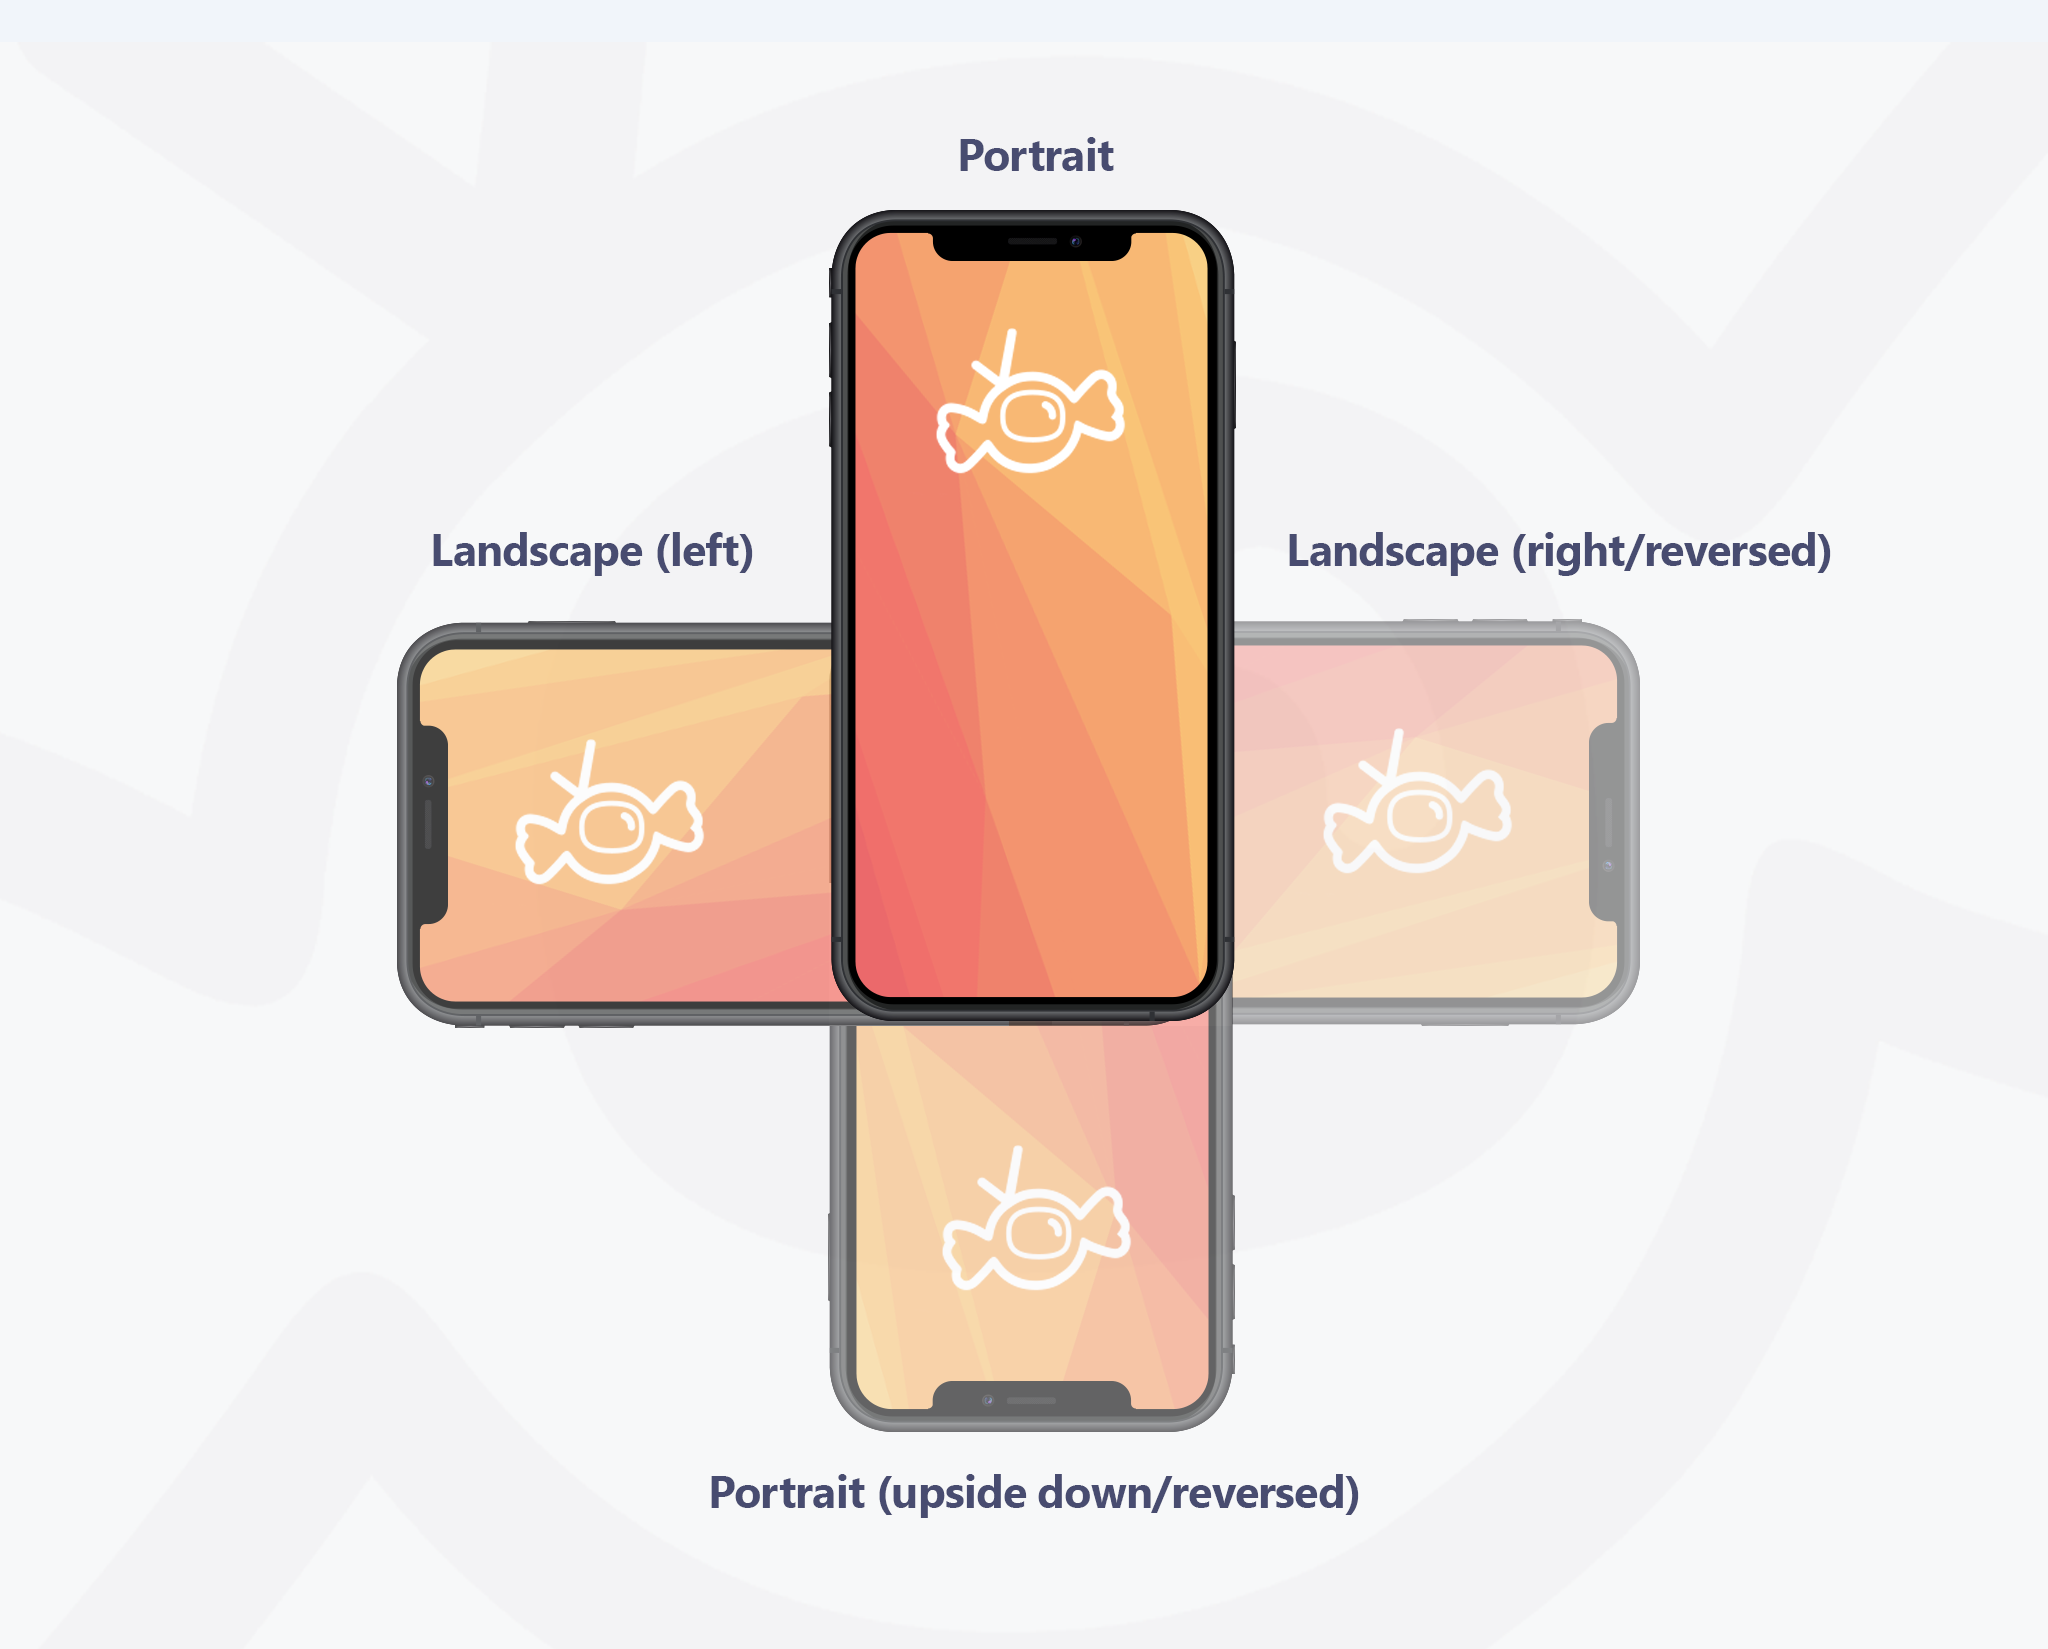
Suitest allows you to set up the screen orientation for your app execution inside a configuration. If you do not explicitly set up the orientation, application will be executed in the Portrait orientation.
Waiting for application quiescence
When opening the application on a device, if this feature is turned on Suitest waits for quiescence as a confirmation that the app has been fully loaded.
suitester
The tvOS/iOS suitester sets the AccessibilityIdentifier for elements that do not have this
attribute set in your application. To improve reliability of XPath selectors. Check the
suitester section for more information.
Uploading iOS / iPadOS Simulator builds
For the simulator, the .ipa files are not suitable. Instead, we need build for
the x86_64 architecture. This can be achieved by doing the following:
- Select the simulator in Xcode.

Simulator selected - Build the project -
Product > Buildor[CMD] + B.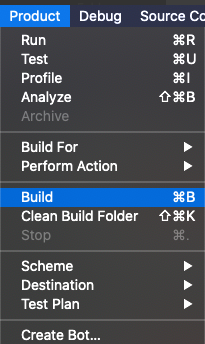
Build the project - Show inside of finder.
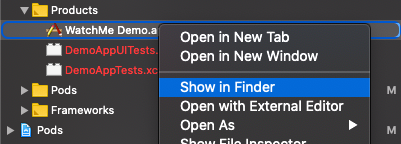
Show the product in finder - Find the package inside of folder.
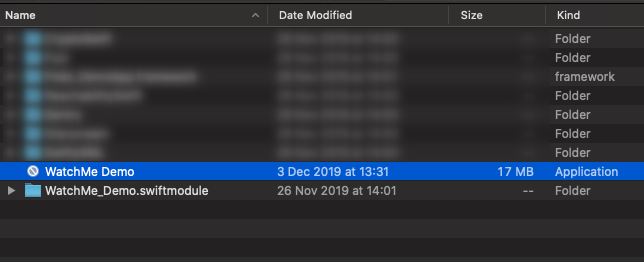
Package to be uploaded to Suitest configuration (Settings) - Archive the package to a
.zipfile.